Navajo Taco’s
Thanks to cousin Kim and Aunt D, we have been enjoying these for years. Every year for our county fair, we’d take our camp trailer into town and stay at an RV park close to the fairgrounds. Several family members would do the same. My husbands family would cook a meal for everyone at the campground one night during the fair so we could all enjoy some good home cooked food instead of eating fair food all week. They made these Navajo Taco’s and we loved them! Literally. We use our own dough mix recipe but they are just as good. I hope you will try them too!
We start with a French Bread recipe that I got from my SIL:
1 ¼ cup warm water
2 teaspoons sugar
1 teaspoon salt (I always use sea salt)
3 ~ 3 ¼ cups flour
1 ½ teaspoons active dry yeast
Add the warm water, yeast and sugar in a fairly large bowl and let it set for about 5 minutes. Add the salt and enough of the flour to make the dough soft and not sticky. You don’t want a heavy dough.
Knead the dough for several minutes, then roll it out with a rolling pin to about ½” thickness. It doesn’t need to be perfectly rectangular, round or oval, imperfection is okay here. Cut the dough into scones by cutting strips about 5-6” in length and about 3-4” wide. I use a pizza cutter. It works great. Let set for about 10 minutes and preheat your deep fat fryer while you’re waiting. Once it’s ready, put a couple of the scones into the hot grease browning each side and then let them drain on a paper towel covered plate.
Once they are all cooked, you’re ready to top them with your favorite taco toppings of choice. We usually top our Navajo Taco’s with browned hamburger, pork n beans or refried beans, grated Colby Jack cheese and finish off with chopped lettuce, tomatoes, onions and olives. You can also use hot sauce, salsa or ranch dressing to top it off. My favorite topping is chili and grated cheese. Let me tell you, it’s delish!
These are a great year-round food and can be wrapped up and taken on a picnic or sitting by a warm fire in the winter.
~~~~~~~~~~~~~~~~~~~~~~~~~~~~~~~~~~~~~~~~~~~~~~~~~~~~~~~~~~~~~~~~~
Mother Nature's Candy
Not many people know this, but........my daughter, Cheyenne Rose, does not like candy. Who doesn't like candy?! Really! She doesn't even like to smell sweets of any kind. She says it smells bad. (Actually I would have to agree that sugar is not the most tempting scent for me either). It's no wonder she's so skinny! Usually when she's looking for a treat, what she wants is all natural, healthy, fruit leather.
I'm going to show you how to save all that natural produce yumminess even if it's slightly over ripe (but unbruised). No added sugar!!! And you can feel confident knowing you're giving your kiddos something healthy that tastes good.
To start, pare or peel your fruit (if it has a thicker skin, like apples), or wash thinner-skinned fruit, like berries. Remove the pits, seeds and cores. Using a blender or food processor, puree the fruit until it's a very thick but pourable puree. If needed, you can add small amounts of water to get the right consistency. For every two cups of light colored fruit, use 2 teaspoons of lemon juice to prevent darkening. You can also use applesauce for up to half of the puree. It decreases the tartness, makes it go further and makes it more pliable.
Now that it's all smooth, get out your cookie sheets :) They will need to have sides. Line the bottom of the cookie sheet with wax paper. You're ready to add the puree and spread it out thin to about 1/4" thickness. About 2-1/2 cups of puree per cookie sheet should do it. If you have a dehydrator, great! If not, an oven turned on to 135* will work just fine. Dehydrators take about six to eight hours to dry, an oven is up to eighteen hours or one to two days in the sun. Fruit leather might be easy to make but it's definitely not quick!
When it's of fruit leather consistency, take the wax paper out of the cookie sheet and let it cool on a cake rack. Once cooled, you can roll it up, wax paper and all, slice it in sections, however big or small you want them, and store in an airtight container or bag in a cool dark area. It will store for six months up to a year or even longer if you put it in the freezer.
If you're like me, you probably have to hide it to make it last longer. Otherwise, my kids would have it gone in about two days. But I'd rather them eat healthy snacks like this than high calorie, teeth rotting, empty nutrition sugary snack foods. Even I get tired of just snacking on an apple. I like to mix it up by making green smoothies with fruit or adding fruit to my other baking recipes. But at the top of our favorite list is definitely fruit leather! Happy snacking! :)
If you're like me, you probably have to hide it to make it last longer. Otherwise, my kids would have it gone in about two days. But I'd rather them eat healthy snacks like this than high calorie, teeth rotting, empty nutrition sugary snack foods. Even I get tired of just snacking on an apple. I like to mix it up by making green smoothies with fruit or adding fruit to my other baking recipes. But at the top of our favorite list is definitely fruit leather! Happy snacking! :)
Mother Nature's Natural Healthy Homemade Yumminess!

~~~~~~~~~~~~~~~~~~~~~~~~~~~~~~~~~~~~~~~~~~~~~~~~~~~~~~~~~~~~~~~~~~~~~~~~
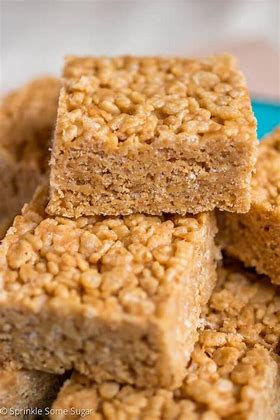
Peanut Butter Rice Krispies
This is definitely a family favorite here on the ranch. There is a pan of these on every dessert table at every family gathering for every occasion. Grandma Max passed this recipe down to anyone who wanted it and if you were family, it was automatic. I hope you enjoy these as much as we do!
1 cup Sugar
1 1/2 cups Karo Syrup
1 1/2 cups Creamy Peanut Butter
7 cups Rice Krispies Cereal
In a saucepan over medium heat, melt together the sugar and syrup until sugar is dissolved and see-through. Add peanut butter and stir until smooth. In a large bowl, add the rice krispies and pour melted mixture over the top. Mix well and spread the mixture into a lightly greased 9" x 13" cake pan. Let cool and keep covered for softness.
Yes! It's that easy!!!
And so Delicious!!! I hope your family enjoys these as much as we do!
